
Suunto D6 & Suunto D6i
Tibby Adapters fit both the D6, and the D6i,
and are super easy to install
Tools Needed:
Anything marked with an Asterix (*) is optional
- * Neoprene Mat
- Well lighted work area, with no distractions
- Torx T-6 or T5 Screwdriver
- * Small container for the screws while you are changing the adapters
If your installing these on a "Tibby Strap" you'll also need:
- One Small set of Pliers, or something that allows you to grip the strap itself once you get a bit of it under the Springbar.

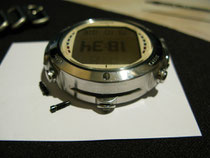
Tibby D6 Adapters View 001, click the pic to see it full size
See the small bar with a hole in it?
There is a Screw at the 12 O'Clock & 6 O'Clock position on the top of the watch
Underneath the watch there are two other screws, but these two screws on the bottom are the ones to take off the watch case back.
DONT TOUCH THE SCREWS ON THE BOTTOM!
Fooling around with the screws on the bottom could have an effect on the water resistance of your watch, so please dont touch them at all.
If you do, or have by accident started to take one of them out, put it back in, and take your watch to a authorised dealer to have the water resistance checked.
BTW, since you will be paying for the labour part anyway, you may as well get the Battery changed at the same time, the parts are cheap, and your already paying for the labour, so it's a smart thing to do.
Here you can see the corresponding "Slot" on the watch body, the one on the Adapter fits right in to there.
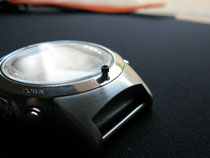
This screw is Removed and Replaced using a Torx "T-6 or T-5" screwdriver Note: that on the new watches the screw is a T-5
If you need one, add a note in the "Note to seller" space on your pay-Pal check out page, and I will e-mail you with an invoice.
When you remove them, do yourself a favour and put them in to a small dish, ashtray, any small container that will stop them rolling away.Once you have the Adapter in the same position as the OEM Band used to be, you can screw them back in. Be careful with these screws as they are very tiny, and easily strip. If you are using one of our straps, you wont need any threadlocker at all, because even if the screw were to fall out, the strap fits very tight on the Adapters so they wont move out of position.With any other type of strap, you would "Can" apply a small amount of a Light strength threadlocker to the screw before you replace it, however no threadlocking fluid is better,because of how easy these torx screws are to strip Snug it up with the Torx Screwdriver, just so it's tight, but stop well before you could strip the screw head. If your using the straps we make then, go on to the next part, if your using another type, your done except for putting on your strap. if your using the Tibby Adapter Straps, they are really thick, and since the Adapters were made to be tight getting them on the Strap can be a bit of a Trial...(not so much any more, the MKII adapters are slightly looser) First thing to do, is install the spring bars, these are "shoulder-less" pins so that they will go a lot further in to the holes on the Adapters.You will also notice that the tolerances are really tight, the spring bars once they are installed properly have almost no gap at each side, this is one of the ways to make them really strong. so you have your Adapters on your watch, then take the strap and 1st you un-thread it from the short bottom strap, then use just the end of the strap and wiggle as much of it as you can going from the top of the Bottom Adapter out the bottom of it.(Here's where the Pliers come in) Take your pliers and grab as much of the strap as you can, be careful that you have enough of it so that when you pull, you don't screw up the end of the Strap, and start slowly pulling it through.Stop when you have about 5-7 mm of strap left, you will need the little bit of space left so that the strap will lay down properly once it's finished. Then take the strap and feed it up through the bottom of the Top Adapter, wiggle it through till you can grab it again with the pliers, and then slowly pull it through till it is just tight so there is no slack between the two adapters. Then thread it through the two stainless rings on the other end of the short bottom piece.Take some time to adjust the strap properly, its really stiff at this point, but it will begin to soften in a couple of days., especially if you get it wet, then wear it till it dries If there is any problems, feel free to ask, just e-mail me and I'll try and help you out. Cheers
Please feel free to share this page with your friends